Sometimes you’re in such a rush to write code that you forget to switch branches and only realize later that oops… wrong branch! What do you do then? Some might even be tempted to copy their code elsewhere, switch branches and then copy it back. Well, there’s a better, more graceful way called stash and pop that comes into play. Not only do they give you a way to temporarily store your code on a branch, but they let you move it to other branches as well.
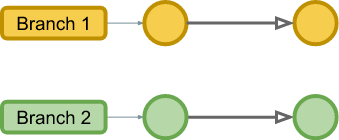
You start with two branches
Let’s start with a scenario that a lot of of us find ourselves in often, you have a project with two branches. Simple.
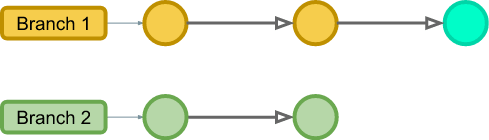
You do some work
You just did a merge into your master branch, and both branches look the same. Assuming that you switched already, you switched to the other branch.
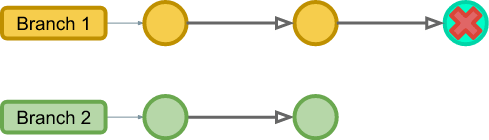
You realize you’re on the wrong branch
Then after doing some amazing code you realize it - you’re on the wrong branch! Arg and all sorts of other curses. So what to do? Reset the branch back and lose all your work? Copy out the code to another folder and then try to paste it back in? Or the long loved ctrl-z shuffle?
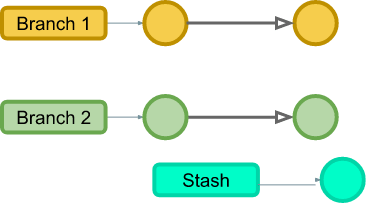
You Stash the code
That’s when you remember the stash command. This will allow you to take all of your work, without a commit and put it to the side for later use. So you jump into the command line and type the following commands:
git stash
That’s it!
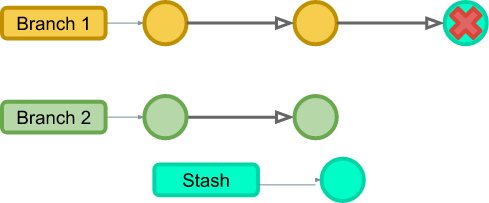
The branch is reset auto-magically
If you look back now, you’ll notice the files now look just like they did before you started making changes to them. To be sure that we have a good stash let’s check for it. You do this by typing:
git stash list
Now, like we talked about in the branching post type the following to switch to the branch that you really wanted to work on.
git checkout yourBranchNameHere
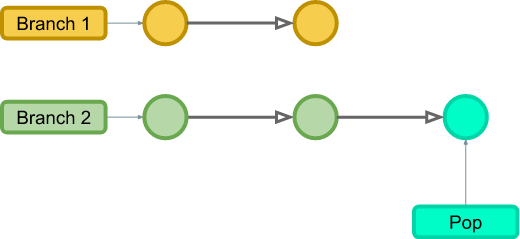
You move the code
Now that you’re on the right branch you can apply that stash of code that you did a few moments ago, but first let’s check that there are not any other stashes left over from before. To do this you type:
git stash list
We get the below output and see that there is code that we didn’t want to apply at this time.
$ git stash list
stash@{0}: WIP on master: fcd7fec The stash that we want
stash@{1}: WIP on TestBranch: 15d176a Some code that we don't need right now
git stash apply stash@{0}
OR
git stash pop stash@{0}
We’ll talk about the differences between apply and pop in the next section.
In my case I used apply, and I get the following after the command:
On branch develop
Your branch is up to date with 'origin/develop'.

Changes not staged for commit:
  (use "git add <file>..." to update what will be committed)
  (use "git checkout -- <file>..." to discard changes in working directory)

        modified:   file1.md
        modified:   file2.md

no changes added to commit (use "git add" and/or "git commit -a")
Here you can see the two files that you changed earlier, from here you can commit the code to keep.
Cleaning up
Now that your code is safe and sound in your commit there might be some cleaning up to do. Earlier, we had an option to apply or pop, well this is where it makes the difference. If you used pop, than the stash was removed after it was applied. Otherwise, the stash stays there until you tell it otherwise, and in some cases this is a desirable action.
If you did the simple apply, first you check the existing stash’s with the following command:
git stash list
For our example we get the same as we did before, as seen below.
$ git stash list
stash@{0}: WIP on master: fcd7fec The stash that we want
stash@{1}: WIP on TestBranch: 15d176a Some code that we don't need right now
They’re both still there. You could keep them there, but then that just becomes messy after a while, so let’s delete the one that we just applied.
git stash drop stash@{0}
We should then get something to the following extent.
Dropped stash@{0} (8a42bf3ec99d45284c51f692e4dcc44062a1cfb3)
We can confirm that the stash was removed with the list command again.
$ git stash list
stash@{0}: WIP on TestBranch: 15d176a Some code that we don't need right now
Further Reading
Below are the references I used and you could too if you want to dive into the git stash command a little more:
Overall
The stash command is a great way to save your work temporarily without a commit, and even move code to the right place on the occasion. While useful, it’s important to remember that this code does not get synced. Hopefully, this write up has helped you work through the stash command and broadened your knowledge of git.
If you missed one of the git articles, please check it out from the below series links.