So far in our git series, we’ve taken a look at all the steps needed to start using git to track and store your code. We haven’t looked into one of the most powerful parts of git which is branches. Branches solves the problem where you might be working on X at the moment, but Y needs attention now. Branches additionally help when working with other people on projects. For example, when I first started writing code this seemed so easy and my steps usually included something like:
- Copy the code somewhere else
- Search thru countless zip files which I typically had a date on
- Fix or edit some code
- Make a new zip file
- Try to remember what I changed and then apply those changes to my new code
Needless to say, this was a pain to manage and sometimes I’d re-introduce bugs to code, which is embarrassing, not to mention time consuming. Add another coder into the mix and you’ve got a total mess of code edits and blending. Yuck
With git branches, you have an easy to use way to accomplish all of the above without the headache or drama.
Branch
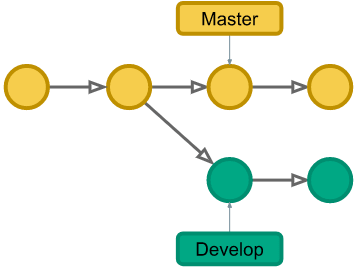
Think of it as a place to work which can be isolated, but then simply merged back into the base code. In the below example, I branch off of the master branch onto one called develop. You can name the branches whatever you’d like, but I tend to stick with the default git-flow names. git-flow deserves its own post, but the gist of it is a standard naming convention and merging pattern like this:
- Master (Your production code)
- Develop (Integration)
- Release - X (where X is the name of your release, for prep and testing)
- Feature - X (where X is the name of your feature, adding features)
- Hotfix (for fixes in production)
Again, this is not required, but it’s an easy pattern to follow - for this tutorial we’re only going to be dealing with two branches. If you’re using a git graphical interface there’s typically a button to do this. Otherwise, change the directory in your terminal to your project folder and type the following to create a develop branch.
git branch develop
That’s it. You’ve now created a branch off of the master based on where it was when you branched.
Checkout
It’s great and all to create branches, but you’ll need to call out what branch to work on in git. The Checkout command switches the branch you are on. In a git graphical interface, there is typically a button or right click type command. In the command line you can type the following:
git checkout develop
To switch to another branch.
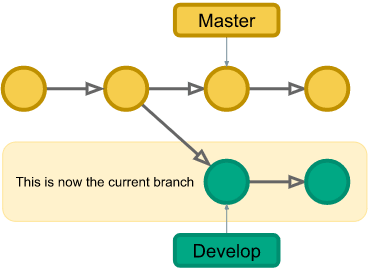
From here you can work on the develop branch committing as you have this far with the typical cycle.
If your using the command line, you might need to enter the following command to push your code
git push --set-upstream origin develop
git will prompt you if you need to.
Now for the real trick - after committing your last commit and pushing the code to your remote, go ahead and checkout the master branch with the following command:
git checkout master
Notice the folder looks just like it did before you branched? That not only lets you keep all of your tooling pointed at the same directory during checkouts, but also lets you work on the master branch in parallel. To wrap up this section though lets checkout the develop branch again with the following:
git checkout develop
Take another look at the folder, all of your committed changes show back up again.
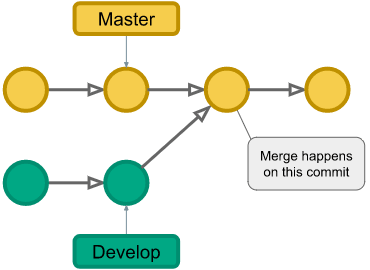
Merge
Now that we can create branches and work on code isolated on them, we need a way to get all of the code back to one branch. This command is called Merge and it brings a branch into another. Be cautious of conflicts, at this point if your working by yourself you don’t need to worry about them too much. We’ll cover merge conflicts in a later post, so stay tuned. For now the general concept is illustrated below.
So how do we do this? It’s straight forward for the most part, most git graphical user interfaces have a button simply called merge. If you use the command line like I do on my Thinkpad Chromebook using git via Termux then the following steps are needed.
In the command line make sure you’re in the correct directory then type the following, assuming your branch names are the same as mine.
git checkout master
git merge develop
That’s it. Not too bad, right?
What’s next?
Now you should be able to branch and do light merging. Practice this on a dummy project until you feel like you’ve got it under control, and don’t get deterred if it takes a couple tries to really get it. Here’s a link to the git-scm Book which I always reference, particularly for this post. It’s lengthy, but is a good source for git information too. In the next post we’ll get into merge conflicts and how to handle them.
If you missed one of the articles, select it from the below series link.
Links to the other posts in the Learning git series
- Intro to git - Part 1
- The git cycle
- Setting up git
- Initializing git
- What's a remote in git
- git branches simply explained
- git Merges Demystified
- How to use git flow
- git stash and pop
Always follow the manufacturers instructions, this write up is simply the way that I do it, and it may or may not be the right way. Use your common sense when applying products to or altering your stuff and always wear the appropriate safety gear.