
I like rocket ships - one of the best things about living where we do in Florida is that we get to watch the launches from our front porch. So I got to thinking, is git like a rocket ship? I busted out the doodling pad and realized yes it is - even more like one of the new reusable rockets, but that’s aside the point.
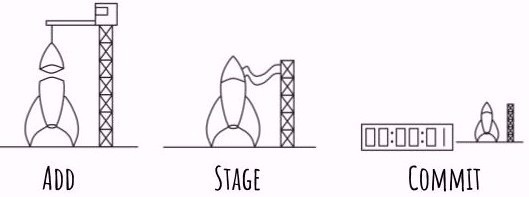
Like any tool, there’s a cycle or pattern to it, and git is no different in that aspect. There are really three basic commands that you need to use often and they kind of relate to the life cycle of a rocket.
So three steps - not too bad, right? For this post we’re only going to focus on these and nothing else - there’s other stuff going on but we don’t care about it at this point. For now we don’t even care about installing git, how to track a folder, setting up the environment on your local machine, BitBucket or Github. We’ll build on the same pattern in later posts, so keep that in mind - we’re going for the basics here.
Add
This command simply tells git to start tracking a particular file or folder. Think about adding the parts to the rocket - kind of. Now, a common problem that people learning to use git end up doing is that they add all the files. Sometimes you want that, but most the time you don’t. git is designed to be a source control system, adding and tracking compiled or temp files won’t bring you much value. Additionally, tracking compiled files will cause you headaches with merge conflicts (we’ll cover this later), and it’s just easier to avoid the issue up front.
Stage
This is a command that allows you to curate a little what you want to store in the eventual commit. Most the time you’ll simply say all the files that I’ve tracked, but occasionally you’ll want to only select certain parts of the modified code. An example is if you temporarily expose a variable as global for debugging. It’s not something that you want in the source control, so instead of going through your file and removing it you can simply not stage it. Another example is if you want to split your changes between two commits so they make a little more sense.
Commit
This is where the snapshot of your code really happens, like the count down timer to go - everything is packed and ready. Anything that is staged gets added here and it creates a snapshot in time of your project. Be detailed on your descriptions. You’ll thank yourself later and so will the other contributors to the project. When writing the commit message try to think of things that you or others might search on in the future and add that detail to the message. You can search commit messages and that’s an overlooked but useful by product of the commit. Please, just please don’t let your commit messages end up like those below - you’ll judge you later and your colleagues will judge you now.

Image / comic credit https://xkcd.com/1296/
What’s next?
Well, you can continue this cycle for as many times as you like. git works on your local machine first, so you don’t even need an internet or network connection to make it work. In the next git post, we’ll cover installation and setting up your environment. If you missed one of the articles, select it from the below series link.
Links to the other posts in the Learning git series
- Intro to git - Part 1
- The git cycle
- Setting up git
- Initializing git
- What's a remote in git
- git branches simply explained
- git Merges Demystified
- How to use git flow
- git stash and pop
Always follow the manufacturers instructions, this write up is simply the way that I do it, and it may or may not be the right way. Use your common sense when applying products to or altering your stuff and always wear the appropriate safety gear.