Overall
If you’ve been following along with the 3D printing series you’ll know that it’s fairly easy to use a Chromebook to print to your 3D printer using an AstroBox Gateway Raspberry Pi 3 Kit. For a while now it’s been perfect while learning the ropes of 3D printing, but now I’ve moved into an area where I want pre-existing parts to integrate into my projects and that’s where the problem is. With the current setup of a Monoprice Mini Delta and the Astrobox there is no easy way to adjust for your machine’s particulars. Follow along to see how I’ve mitigated the issue for myself and you can leverage the same solution too!
Step 1 admitting there is a problem
I first started noticing that there was a slight issue with printing when a part just felt off when I went to put it on something. Not too much, but just enough to know something was off. So I printed off a XYZ 20mm Calibration Cube from thingiverse and used a digital Caliper to check. Sure enough the printer was off. I was getting 19.4 mm instead of the 20 mm on both the X and Y planes. I attempted to fix this in the slicer settings, but just got nowhere with them.
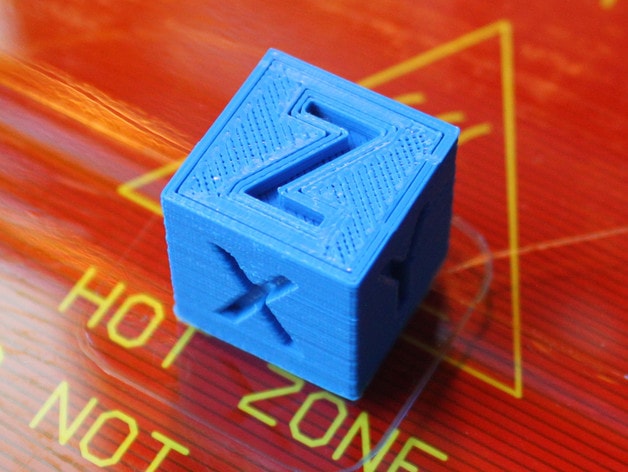
This is the calibration cube I used from thingiverse by iDig3Dprinting
Initial solution
Since I like TinkerCAD my initial solution was to import the object into a new project, calculate the new X and Y, followed by exporting the object out as a STL. This worked, but was really tedious and boring. Even more was that I now couldn’t easily do all the steps with a tablet or phone (really a first world problems here - I know) making it just a little more difficult to print an accurately scaled print. There had to be a better, or at least less manual, way to do this.
The lazy programmer
Since coding is what I do and I had all the tool chain required for building a single page application from my gisty project which I wrote about here. I figured that I’d see if I could build something to fix the scaling without any or much cost - that is if you don’t count the development time. So I fired up my trusty Chromebook and started researching what was out there that could help me.
At first I thought about a node.js application for Firebase or a Python application for Amazon Web services, but both really felt too heavy for what I was doing. Additionally, while they both have generous free tiers, there still is that ‘it could cost something’ aspect - which I really wanted to avoid. So I went back to my tried and true single page web application.
The problem that I was facing was how to read and manipulate a 3D stl file. I knew that some sites were doing it, but I assumed that they were using a back end type system to do this. That was until I came across meshy, and while it did too much it proved to me that the threejs library could in fact do a lot of the heavy lifting.
As a side note threejs has amazing example code, which formed the foundation of my solution.
Building the solution
From the threejs examples with bits of skeleton css and html5rocks code, I was able to put the base of a solution together. It completes the basic ‘fix the scale’ problem that I had quite nicely and costs nothing to run. It even has things that I didn’t need such as the 3D viewer, but were just cool.
I did run into a few issues with building it though, things that I had not needed to care about in the past. Primarily, the 3D view was the biggest pain point that I had, and almost caused that feature to never make it. The 3D camera math was really messing with me, even with the good example code. I eventually got it to work, but it really is at the state of “that’s enough now” that I believe everyone eventually gets to.
Another part that was new to me was the uploading and downloading files processed in the browser. Both html5rocks and meshy gave me enough hints to get the solution to work, but it did take some work. The major part that I enjoyed about the solution was that I could post-pend the file names, so I could easily identify the changed files.
Using it
The great thing about github pages is that you can easily host single page applications. To use the STL Scaler Application simply click the Link and you can use my work. Once your on the page it’s as simple as the following:
- Print a calibration object
- Enter what the measurement should be with a digital Caliper
- Enter what it actually is from your 3D printer
- Upload the STL file
- Export the corrected STL file
That’s it! I’ve even done this from my cell phone in the garage as that’s where our 3D printer lives.
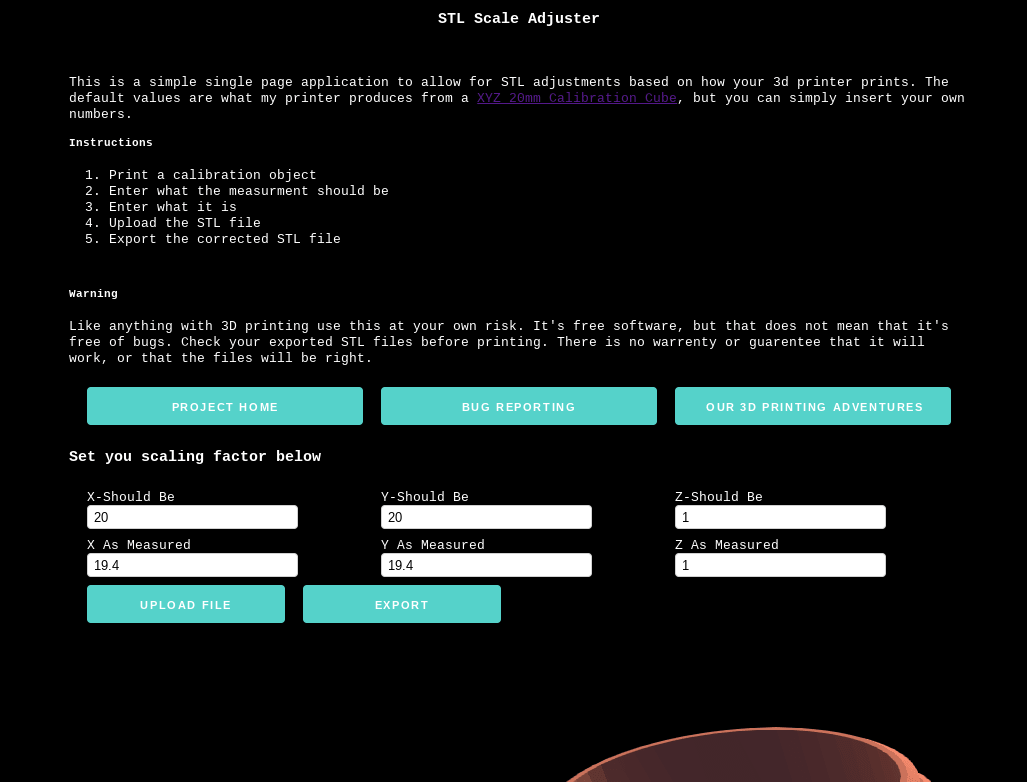
STL-Scaler as of 2018-07-11
Overall
This was a fun little project that I wrapped up in half a day. While I could have scaled about 24 objects in that time, I’ve already surpassed that number which makes this a net positive for me. If you’re interested in contributing to the project, here’s a link to the STL Scaler Repo. Even if you don’t code you can contribute by logging issues, making better documentation, etc.
Disclaimer
Like anything with 3D printing, use this at your own risk. It’s free software, but that does not mean that it’s free of bugs. Check your exported STL files before printing. There is no warranty or guarantee that it will work, or that the files will be right.
Always follow the manufacturers instructions, this write up is simply the way that I do it, and it may or may not be the right way. Use your common sense when applying products to or altering your stuff and always wear the appropriate safety gear.
Links to the other posts in the 3D Printing series
- 3D Printing from a Chromebook
- Monoprice Mini Delta
- 3D Printing with Astroprint
- Scaling woes with 3D Printing
- Maxing out the Mini Delta 3D printer